
How To Bulk Upload Labels To Google AdWords
Segment Your Account Based on Your Own Criteria
The success of your Google AdWords campaigns largely depend on how good you are with the data inside them. The more you can understand about your keyword performance, the better. Whilst AdWords gives you the ability to segment your keyword performance by times, days, device type and so on, it’s the label function that gives you the greatest flexibility in order to tag your keywords in ways that you feel fit, based on how you want to analyse your performance.
However, one major flaw with labels is that Google AdWords and the AdWords editor don’t let you create labels on mass very easily. That’s where scripts come in.
In this article, I’ll walk you through the process of adding labels in bulk through AdWords scripts, and how that can then change the way you look at your accounts for the better.
Preparing Your Data
Step one is preparing your data. This can be quite a painful process, but is worth it in the long run. There are a few steps here, but this will ensure that your data is in the right format for the script to work to label your keywords in AdWords.
The way we do this is to first go into AdWords and export all of the keywords that are in the account we want to label in a .xlsx format.
For the purposes of what we’re doing with labelling, we don’t need a lot of the data that we get in this export, so delete all columns except those that contain the following:
- Campaign Name
- AdGroup Name
- Keyword
Next, make sure your spreadsheet is formatted with campaigns in column A, adgroups in column B, and keywords in column C.
Label column D as ‘Match’ - this is where we’re going to enter the match type of each keyword. To do this, simply filter your spreadsheet on the keyword column and use the following criterias to fill in column D:
- Any keywords containing [ are classified as an exact match
- Any keywords containing ” are classified as a phrase match
- Any keywords containing + are classified as a broad match
- Any keywords that don’t contain [, “, or + are classified as a broad match
Check for blanks, but column D should now be completed. Make sure no filters are on, and next we need to take out the punctuation from your keywords (with the exception of the +’s IMPORTANT that these are left in).
To do this, we’re going to use the Excel find and replace function. Press CTRL + F to bring up the find box, and complete the following operations:
- Find [ and replace with blank (don’t put any characters in the replace field). Click replace all
- Find ] and replace with blank (don’t put any characters in the replace field). Click replace all
- Find ” and replace with blank (don’t put any characters in the replace field). Click replace all
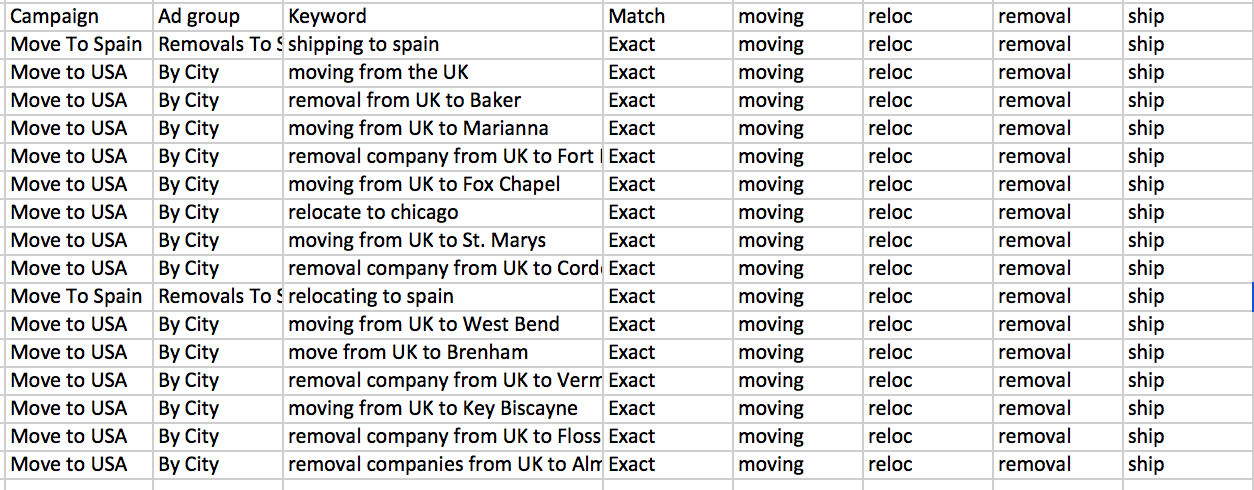
Now the data is ready to start adding labels, and should look something like the below in terms of format:

Labelling Your Keywords
Now the data is ready, it’s time to assign some labels. If you’re dealing with a low number of keywords then feel free to add them in manually. If you’ve got a big account with thousands of keywords, we’ve found the quickest way to apply labels to be the below.
First, you need to define what labels you want to create and assign to these keywords. Let’s say you’re trying to label keywords by the words they contain to get a better understanding of performance for instance. In this example, lets choose four labels of moving, relocation, removals, and ship for instance. What you’ll need to do is create a column for each label and fill that column in with the same text in every row (all in lowercase). The formula we’re going to use is going to look for the text you put in these columns within the keyword text. Because of that we’ll enter removals as ‘removal’ and relocation as ‘reloc’ in order to capture variations that will apply under the same label. This will look like the below:
Next, we create four more columns, each titled as one of the labels (so ship, moving, relocation and removals). In the first cell of the first new column add this formula:
=isnumber(find(E2,$C2))
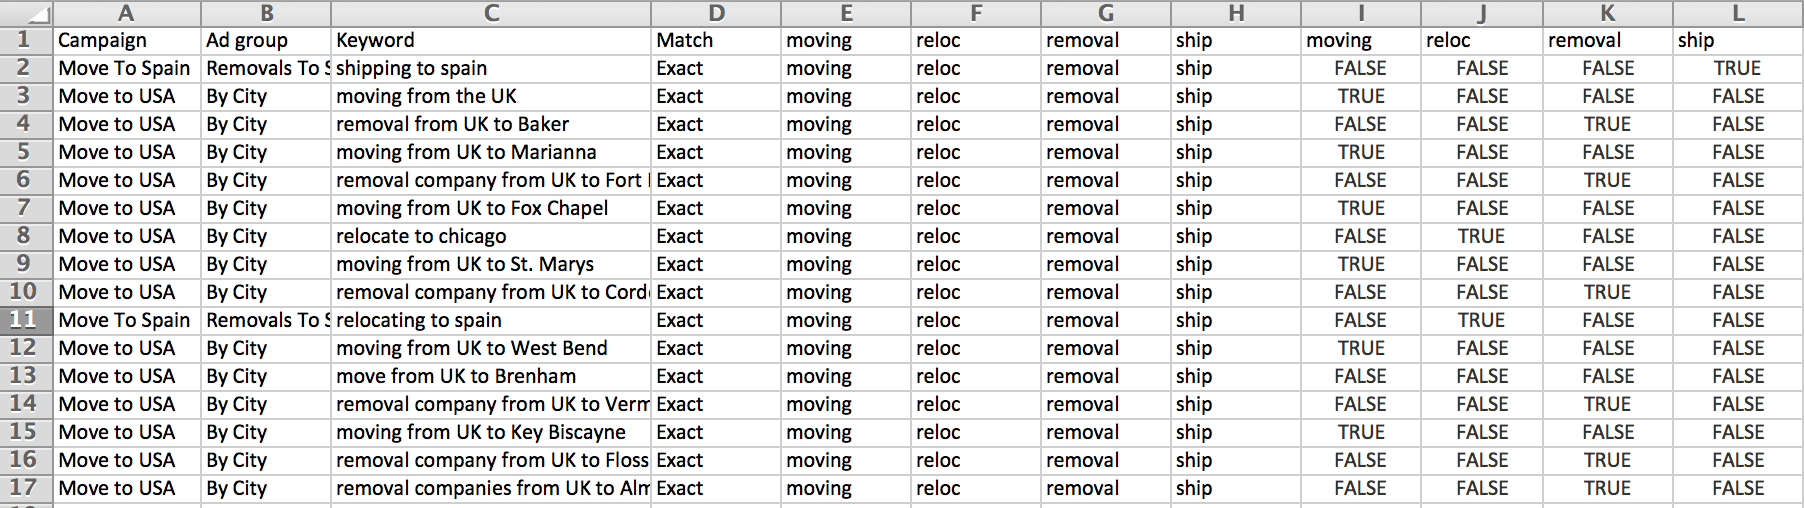
Amend this where needed if you’ve got extra columns, but if you’ve followed this exactly and have only four labels then that should work. Next, you can drag this formula to fill in all of the blank cells in the new columns. This will tell you if you have a match (shows TRUE), or not (shows FALSE).
The spreadsheet will now look like this:
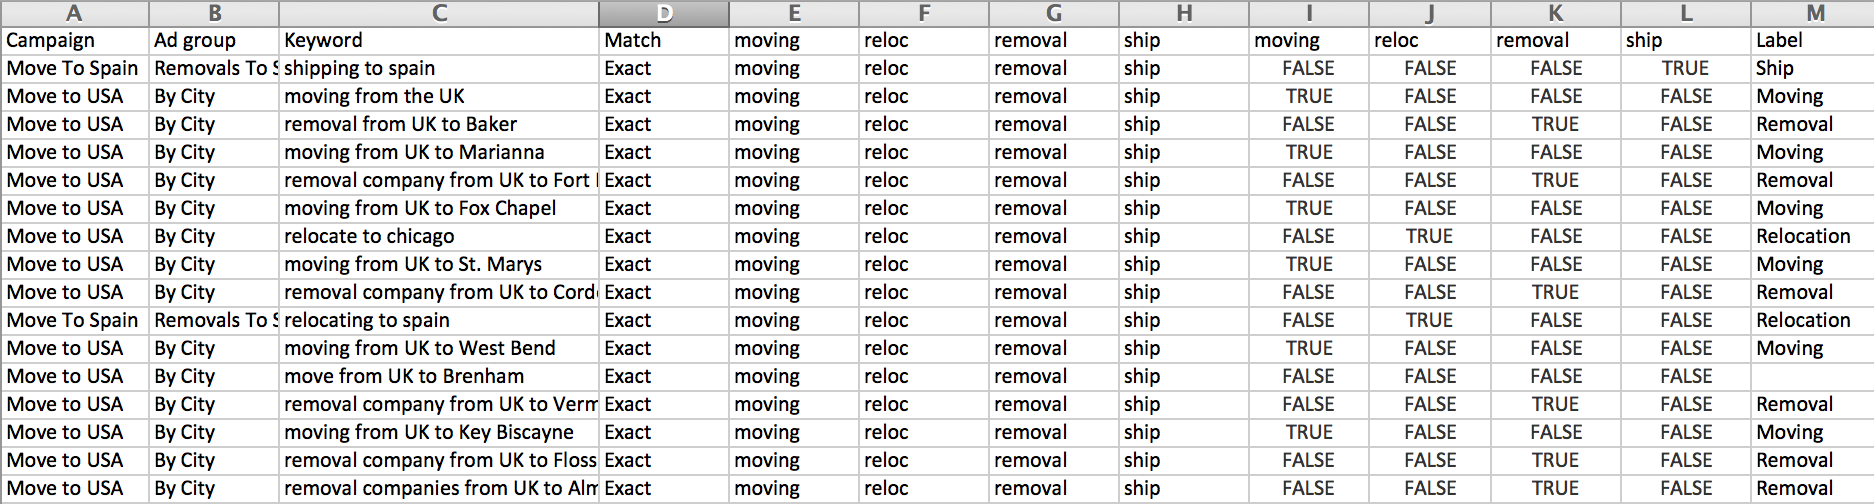
The final step in labelling your data is to create a new column on the end called ‘Label’. Next, filter in turn on your TRUE/FALSE columns. Go to the first TRUE/FALSE column and filter to just show those that are TRUE. Add this label to the label column for the keywords where this is TRUE. Unfilter, and then filter on the next column and repeat the process. This will mean that your label column will be complete and will look like this:
 Now you can get rid of all of the columns between the ‘Match’ column and the ‘Label’ column, leaving you with five columns. Don’t worry if some keywords don’t have labels, these won’t be amended at the next step.
Next, we need to put this data into a Google spreadsheet. Use the same Google drive login that your AdWords is under for ease. Only thing to bear in mind at this stage is that broad match modifier keywords (+keywords +like +this) will show as an error in Google sheets if imported in this format. Filter your Excel sheet to just show keywords containing +’s. Run a concatenate function to add in a space and a ‘ symbol at the start of your broad match modifier keywords. That will make them show as:
=’ +keywords +like +this
The Script
In AdWords, select the account you want to add your labels to, and on the left hand side click ‘Bulk Operations’ and then ‘Scripts’. Click the big red ‘+ Script’ button, and you’re ready to go. Give your script a sensible name based on what you’re doing, and then copy in the below code:
function main() {

// Applies labels to specified keywords, based on a Google Doc Spreadsheet.

//Change the below to your spreadsheet's ID:

var ss= SpreadsheetApp.openById("ADD YOUR GDOC ID");

var inputSheet = ss.getSheetByName("Sheet1"); //The sheet in the Google Doc

var i = 2; //Integer for the loop

var numberOfLabels = inputSheet.getLastRow() //Number of rows in the sheet, which is the number of ad groups that want to be labeled

var lastLabelApplied = ""; //Records the label that was last applied, so if the next label is the same the Script knows it doesn't have to create it again

while (i <= numberOfLabels) //This loops through all the rows

{

if (inputSheet.getRange("F"+i).getValue() == "") //If there are no notes for the current row

{

var labelCampaignName = inputSheet.getRange("A" + i).getValue();

var labelAdGroupName = inputSheet.getRange("B" + i).getValue();

var labelKeywordText = inputSheet.getRange("C" + i).getValue().trim();

var labelMatchType = inputSheet.getRange("D" + i).getValue().trim().toUpperCase();

var labelText = inputSheet.getRange("E" + i).getValue();

var printToSpreadsheet = "-" //This is a variable that records what will be noted in the spreadsheet for each ad group (whether the label has been added, or there was an error)

/////////****************************************************************************************

if (labelMatchType == "BROAD" || labelMatchType == "PHRASE" || labelMatchType == "EXACT") //Checks the match type is valid

{

var keywordIterator = AdWordsApp.keywords() //Finds the keywords with the specified name and campaign name

.withCondition("CampaignName = '" + labelCampaignName + "'")

.withCondition("AdGroupName = '" + labelAdGroupName +"'")

.withCondition("Text = '" + labelKeywordText +"'")

.withCondition("KeywordMatchType = " + labelMatchType)

.get();

Logger.log(keywordIterator)

/////////////////////////////////////////////////////////////////////////////////////////////////////////////////////

if (keywordIterator.hasNext()) //If there is a keyword then the label will be applied

{

var keyword = keywordIterator.next();

if (labelText != lastLabelApplied)

//If this label isn't the same as the last label to be applied, then the label is created.

//If the label was the same as the last label to be applied we know the label already exists, so we can skip this

{

AdWordsApp.createLabel(labelText); //Creates the label - if the label already exists then there may be an error, but the Script will continue

}

keyword.applyLabel(labelText); //Applies the label to the keyword

printToSpreadsheet = "Done";

lastLabelApplied = labelText; //Records the last applied label

}

else

{

//This means the keyword iterator was empty, so there wasn't a keyword of the right name (or a campaign or a group of the right name).

printToSpreadsheet = "Keyword not found"; //An error message will be recorded in the spreadsheet.

}//End 'if valid match type'

////////////////////////////////////////////////////////////////////////////////////////////////////////////

}

else //If match type isn't valid

{

printToSpreadsheet = "Match type invalid"; //An error message will be recorded in the spreadsheet.

}

///////////***************************************************************************************//////////////////////

inputSheet.getRange("F" + i).setValue(printToSpreadsheet); //Writes into the Notes column in the spreadsheet

Logger.log("Label " + labelText + " applied to '" + labelKeywordText + "' in '" + labelAdGroupName + "', '"+ labelCampaignName +"': " + printToSpreadsheet); //Also writes into the Log

}//End 'if there are notes'

i = i+1;

}//End while loop

}
Once this is in you’ll need to follow the below process:
- Copy and paste code in
- Change the spreadsheet ID on line 4 of the code to the spreadsheet that you’re using. You can find the ID after this part of the document URL: docs.google.com/spreadsheets/d/
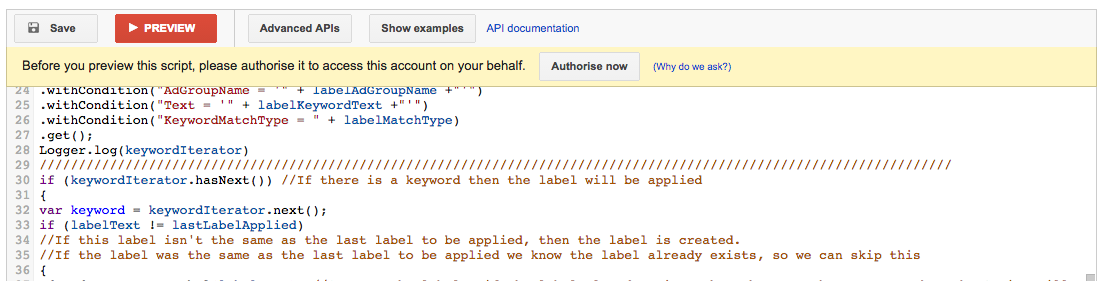
- You’ll get an authorisation message pop up (see screenshot below). Authorise the script to run within your AdWords account
- Click preview. At this stage you’ll get another authorisation message pop up - this one is authorising the script to access and edit your spreadsheet in Google drive. Grant the authorisation.
- Next, click preview again to check for any errors in the logs and to see any changes that will be made when you run the code. You should see all of the labels being created and assigned in the preview.
- When you’re happy either click ‘save’ and then schedule the script for later on, or click ‘Run Script’
Things to bear in mind are that AdWords scripts tend to time out after 30 minutes. From our experience, this script will get through around 1,200 - 1,500 keywords in that time. If you’re doing this on a large scale, then create multiple spreadsheets and multiple scripts to cover all of your keywords and schedule them an hour after each other to allow AdWords to run through all of the data without failing as it tries to do them all at once.
Summary
As mentioned, it’s a bit of an long-winded process, but it certainly speeds up adding thousands of labels to an AdWords account! This then enables you to view your keyword performance by a number of different labels that you create, meaning that you can improve your performance over time.
Have fun with labels, and any questions feel free to ask in the comments.
Pingback: PPC Expectations, Bid management & Ad Rotation | PPC News()